Friday, September 18, 2015

Vocal Exploration Ideas


Vocal exploration is a great way to help primary students find their head voices. For me, it’s been an important step to help students feel comfortable singing. Here are some ways I use it in my classroom.


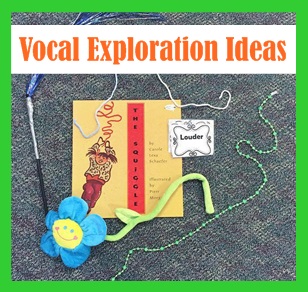
This is a cute book about a girl who finds a string and uses it to create all kinds of interesting shapes. We take strings (you could also use a jump rope) and use them to create the pathway we will follow with our voices. As an extension, you can turn this into a partner game. One student sets up the string and the other student performs it. I also use cards to have students practice with a certain dynamic or tempo.

Moldable Flower
Man, do I love the Dollar Tree. I picked up this genius toy and it made my day! The flower stem has flexible metal inside, so we start at the flower’s face and use the stem as our pathway. If you have enough, this could also be a partner activity like the string.

Teachers Pay Teachers
There are plenty of vocal explorations PDFs for sale at Teachers Pay Teachers, though there are some great free ones too. I like this free PDF with an alien theme from Mrs. Ford’s Melodies.

Here is an example of a SMART presentation I've made, using clip art from Creative Clips.
SMARTboard Ideas
I like to create my own vocal exploration activities. It’s actually very easy to do! I start with two pieces of clip art that go together (candy and a bag, bookworm and a book, guitar and a case, etc.) and use the pen to create a line between the two. I lock the image on the left and the line, and leave the image on the right alone so it can travel on the pathway as students perform it. You can also leave the space blank so students have space to create their own pathway with the pens.

Here are some of my favorite options for clip art, all from Teachers Pay Teachers:
·         Artifex, which has some great music clip art
·         Dancing Crayon has a wide variety of instrument clip art
·         Educlips is a huge store with lots of variety
·         Creative Clips has a wide range of clips and awesome freebies
·         LovinLit is a good source of backgrounds and frames, if you want it to be fancy.

Happy exploring!

Wednesday, September 2, 2015

Using Memes in the Music Room: Part Two


See the first part here.

I love using memes in my class. Kids are definitely exposed to them and love seeing ones they recognize. They are also a great and sneaky way to get kids to make connections. In order to get the joke, kids have to understand the concept the meme is about and be able to apply it to the given situation. Despite having a reputation of being only relevant to teenage geeks, memes are actually great learning tools.

About a year ago, I was spending a good portion of my free time on the internet, scrolling through any music meme I could get my hands on so I could use them with my kids. Kids loved them. The problem I kept running into was that what I found didn’t always fit what I wanted. I never made my own, though, because that just seemed so HARD.

I have a message for my past self: making a meme that is exactly what you want takes significantly less time than google image (or Pinterest) searching for hours and hours.

It’s surprisingly easy. All you have to do is go to a generator (I like this one) and search for a template image to use. Then you add your text.

I can haz piano?
Here’s what I did to make this one: I knew I wanted a meme for the dynamic piano, so I searched for “library” and a cute cat came up. Add in some text and you are done! If you need a specific picture, you can download it to your computer and upload it to the generator. I promise, it is super easy.
I use them as a quick, 1 minute review of our previous lesson’s concepts. Kids have to explain (in a complete sentence) what the joke is and what the term used in the meme means. It’s much more engaging, and more rigorous, than just repeating definitions.

Here are a few I’ve created so far.


My kids struggle with "gradually" getting louder


MEDIUM tempo! Get it? *ba dum dum ch*

I hope you have fun creating memes! Please feel free to share in the comments!

Wednesday, August 26, 2015

Lit Lesson: Listen to the Rain

One of my favorite activities when teaching dynamics is having the students create a rain storm. I start by reading the book. It walks through a rainstorm from start to finish. The book, as it is, is best to demonstrate crescendo. If I want to demonstrate a decrescendo, I read the sections in backwards order.


Students start by watching this video to see how body percussion can show a rain storm. Then we try it as I read the book. When students are confident in when and how to crescendo/decrescendo, we add in paper. I get paper I plan on recycling and crumple it up, then have students use 1-5 fingers to control dynamics.

If you have them, rain instruments are a great add-in. Students play rain sticks and ocean drums the whole time and control their volume just like the students using paper as an instrument. I have a thunder tube (that the kids LOVE) and we only add that at our loudest volume. One of the best things about this activity is you can specialize it for several grades, depending on what dynamics they know and are learning.

It is also easy to tie in a rain song somewhere in the book. Here is a list of rain songsfrom Beth’s Notes that are a good start. Movement with scarves to represent clouds, rain drops, and the sun could also be added. With additions, this book could make an excellent program.
I hope your students have a blast creating rain storms!

Tuesday, August 18, 2015

Classroom Tour 2015-2016!


School started this week, so I’ve been spending some time in my classroom getting ready for the new year. I decided to completely redo my room so it was quite a lot of work, but I’m excited for the results! Prepare for a LOT of pictures and detail. :)

I know many people have different views on classroom decor, how you should do it and how cute or finished a room should be. I focus on making my room as functional as possible, with visual displays to help students remember vocabulary terms. Instead of a specific theme I chose a consistent pattern (chevron) with clear color-coding to help streamline the visuals.

At the back of the room is my word wall. Usually there are instruments set up too, but I won’t get them out until the third week of school. Each grade has its own board. The color is coordinated to the displays around the room, so kids can easily zoom in on their color. Above are smaller movement word walls, organized by locomotor and non-locomotor movements.

The front of the room has a thin table for my computer, document camera, supplies, and serves as my desk. There are steady beat light-sabers, a few chairs (I use them to teach rhythm, admin use them when they come in to observe) a SMART board, and my TAD display.

On the front wall I have a vocabulary display for tempo, articulation, and dynamics. Each term is color-coded to match the back wall and the grade level the term is introduced. That way, students can focus in on the terms we will be learning about.

This is the question board. My school is big on accountable talk, so the top are some phrases that students could use in music. Many of them relate to tempo, dynamics, and preference since that is prominent in the state standards. Below are essential questions for each grade tied to the concepts we are learning.

On one of my cabinets I have an audience and performance behavior display. It’s helpful to have a side-by-side comparison, especially for primary.


I love love LOVE my musical alphabet display. I used the alphabet found here, and color-coded them to match boomwhackers colors. I also have chord cards for I IV and V, as well as examples of what each chord is in the key of C.
Kids love the drum wall. Each are labeled and fit in spots outlined by washi tape. Below are non-pitched percussion instruments in labeled bins that have both a picture of the instrument and the name. On the floor are my two staff carpets.

I finally redid my library this year. Each bin (from the Dollar Tree, naturally) is organized by how I use the books within the classroom. Above are the boomwhackers in cardboard book boxes from Ikea. I copied mini musical alphabet cards that match the larger display and have those as labels. In front of the books I have a rest area for kids to use as a cool-down space.

Above the piano (covered currently with cloth because there isn’t a cover attached and I don’t want kids kerplunking notes when they walk by) are some staff posters I made in college. One day I’ll end up redoing them, but it is not this day. :)

The back cabinet houses my Solfege display and THINK, a strategy for questioning your own behavior that is really helpful when students work in small groups.

Here are my tone bar rules. It also included how we move when we rotate instruments.

This is right above my door. I’m a huge fan of Vlogbrothers, and “don’t forget to be awesome” is something I say fairly often. My kids love it and have started using it too! I used stickers on top of contact paper so I wouldn’t have to worry about getting the stickers off the wall.

Outside my room is one of my favorite boards, the meme board. I’m a huge fan of using memes in my teaching, and this year used a meme generator to create simple memes aligned to the specific skills each grade is learning. Again, it’s color coded to match the word wall. I also use these memes in class; students use them to review concepts. Above I used the Star Wars welcome banners found here.

 
The whole set-up!

EDIT: Here's the Rhythm Wall, one of the only things in my room that stayed the same this year. I love this thing. I has the rhythm, name, and number of sounds/beats. (That is how my curriculum defines rhythms.)

Whew, that was a long one! I hope you got some great ideas, and I hope you have a great school year!

Tuesday, July 28, 2015

Beginning of the Year Kinder Activity


One major concern I had my first year teaching was how to teach the first day of kindergarten. 5-year-olds were about as intimidating as it got for me. Luckily, an experienced teacher in my district passed on an idea that was a big hit. I’ve added a lot to it since then, and it has become something I look forward to each year.

Many of my kindies don’t have preschool experience, so full-day kindergarten can be overwhelming. I see them at the very end of the day as well. By 3 PM of the first day, many are frazzled and ready to go home.

Enter the epic lesson of epic-ness: Scrub a dub!

To save time the first day, I use poly-spots to help the kids get into a circle. Once there, I congratulate them on making it through the day. Then, I make a big deal of sniffing the air and confide that someone is… stinky. And needs a bath.

It is silly, but it breaks the ice. Students start giggling and forget that they were cranky a minute before. Then, I introduce the chant:

Students point out a body part that needs scrubbing (knee, elbow, underarms, feet, etc.) I pick one, and we “scrub” the area using invisible sponges. After the chant we echo sing “All clean” on sol-mi.
Once students get the concept, we add in real sponges. There is one catch: if students touch their sponge before I touch mine, I take their sponge away. They can get it back, but it isn’t easy:  they have to earn it by using an invisible sponge.

The students think this is a fun game. I sweeten the deal by faking out and pretending I’m about to touch my sponge and yanking my hand away. Giggles had by all! In reality, I’m laying the groundwork for instruments by teaching them to follow rules with a quiet manipulative. They also learn my policy that if you get something taken away, the only way to earn it back is by continuing to participate. They know this upfront and it’s introduced in a no-pressure way, making the policy less of a tantrum-inducer once instruments are on the line.

At first, we play the game simply. Once students have that down, I make the game more interesting by adding in musical opposites. Sometimes I stick to one for the entire chant, and sometimes I do both opposites. Students then decide which term matches what we just performed. Once students have mastered the game, they take over my role and take turns being the teacher. They get a kick out of leading, and it’s a great opportunity to assess individual student knowledge of opposites and singing sol-mi.

This activity has served me well, and is actually one of the most requested at the end of the year when I allow students to revisit old favorites. I hope it serves you well!


Friday, July 17, 2015

Summer Book Haul # 2

Anyone who knows me also knows I am a huge fan of children’s literature in the music classroom. I use it constantly. To that end, about once a year I go to every thrift store in town and raid the children’s book sections. I get some funny looks, but I find great books! Here’s my haul from this week’s thrift store adventure. I’ll include a brief description of the book, an Amazon link if you want to check it out, and how I think it could be used in the classroom. (You can find the first book haul of the summer here.)

This is an adorable book about a cowboy who is naturally LOUD and finds that there is a time to holler and a time to hush. This lends itself well to loud/quiet and piano/forte, and could easily transition to crescendo and decrescendo. It could also be a fun way to introduce fortissimo.

This sublimely simple book is full of prepositions as you follow elephants in a hot-air balloon on their way to see their aunt. The art is beautiful as well. This book would make a great tone bar exploration activity, so students can explore what “above,” “below,” and “through” might sound like.

This fun book is part of the Pete the Cat series. It focuses on verbs and their appropriate locations (like eating in the cafeteria). This opens it up to be a fun locomotor movement activity. Where could you slither? If you were in gym class, what is a movement you could be doing?

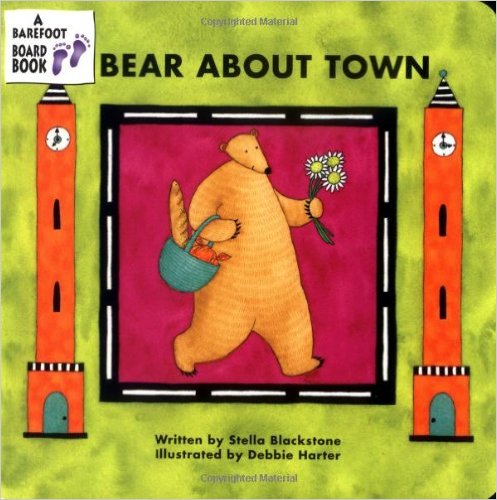
Bear AboutTown, by Stella Blackstone 


A book focusing on the days of the week, Bear About Town opens with, “Bear goes to town every day. He likes to walk all the way.” Each day has a new activity Bear does. The opening sentences could easily be a refrain, and the various activities could tie to a song or be group compositions. There is also a map of Bear’s town in the book, which could be used to extend the activity.

Where’s Spot? tells a story every parent is familiar with: looking for their kid. Each page has a hiding place for Spot to be, and a flap to open to reveal if Spot is there. This could be a great book for kids to play a “drum roll” as a way to explore drums (or any new percussion instrument, really.) Kids love to play fast, and this would give them a productive way to do that so later we can move on.

Poor Harry is a frog who just wants a meal, but every critter he encounters can’t be eaten for one reason or another. Different animals could be represented by different instruments. “You can’t eat me!” could become a sung refrain.

A classic! I want to do an Eric Carle unit with my kinders, and this fits right in. All students could play their instrument to match the number of items the caterpillar is eating, or students could be split up into each food. (With the green leaf counting as only one, there are 16 kinds of items, 26 total, on the caterpillar’s menu.)

This is a great book. Frog and his friends jam out with different movements, and the book is very rhythmic. There are great opportunities for refrains, too.

I am collecting any primary poetry book I can get my hands on, and this one is pirate-themed. I would really like to use these for a group project to close out a unit. Students could use instruments to show sound effects that go with a poem, use the words as a basis for a pentatonic melody, transcribe the rhythm into notation, or create an ostinato to go with the poem. I don’t have it completely worked out yet, but collections of poetry like this one open a lot of very cool doors.

Similar to my intentions for the primary poetry, this collection of short fables could be used for a group project. This would allow older students opportunities to add musical elements to a story. My intermediate kids have extensive experience with me dictating how a story could be made musical, and I would really like to see what they would come up with when given the opportunity to make their own choices. A whole-class version of the project could be used when short weeks prevent you from getting to see more than one or two of your groups.

Summer is flying by, so I hope you find some great materials for your classroom!

Saturday, July 11, 2015

7 Music Room Decorating Tips


It’s beginning to be that time of year again: I am starting to, reluctantly, ease myself into thinking about school again. Are you there, too? One way to prepare for the new year is to start decorating your room. I’ve spent weeks decorating my room before, and I’ve also had an exciting experience (that I never want to repeat) of moving rooms and setting up a new room in a total of 3 hours. Here are some of the things I’ve learned along the way.

Tip #1: Know your fire code
This is a biggie because it varies from state, to city, to district, to school. I see all these wonderful things on Pinterest: things hanging from the ceiling, bulletin board with fabric and triple border, and doors decorated to the max. All of those things are a no-go at my school. We have restrictions on how much paper we can have on the walls, where the paper can be, and NOTHING is allowed on our doors. I learned this the hard way when we changed fire inspectors and I found the new one at my painstakingly decorated door, crumpling up decorations and throwing them away. I was furious! But at the end of the day, even though the policy was a new one I hadn’t known I was breaking, I was guilty of breaking fire code and the door had to stay completely bare. Know what your restrictions are BEFORE you spend your precious time making and hanging decorations/boards.

If you aren't sure what the codes are, check with your building engineer or janitor. It's a good idea to check with them anyway before you do something big like paint furniture or use tape on something in the room. I have friends who didn't consult with their people before they used duct tape on the floor- HUGE mistake. The residue never comes off. Some schools allow you to paint school furniture like shelves or filing cabinets, and some don't. It's always best to check, you have little to lose and being on the building staff's bad side is definitely something to avoid. 

R.I.P. epic and awesome meme door.


Tip #2: Consider functionality vs. aesthetics
There are varying theories on how “cute” a room should be. Some find cute decor necessary to be homey and/or organized, and some find it offensively distracting. Think about where you fall on the spectrum. I am solidly in the middle: everything in my room in functional, but I made sure it looks good too. I color-coordinate everything according to grade and group displays according to musical element, so students know to zoom in on anything that is their color and can zone out any information they don’t need. That helps to counteract the distracting aspect of having stuff around the room. Consider your curriculum and how often you meet with your kids. If you see them for only a short amount of time and they are expected to memorize a lot of vocabulary, visuals of frequently-used concepts could really help your instruction. Room size and wall space can also impact what you do. A huge room could have enough room for a display that is “just for fun” to help the room be inviting to students. But you may want to consider before you wallpaper your room in cute clipart you found on Teachers Pay Teachers, or before you leave your room completely bare: How is this helping my instruction?

An example of my color-coded dynamic display. Cute, but useful!


Tip #3: If you’re going to do something, do it well
I was 100% guilty of sloppy, handwritten decor my first year of teaching. That may have been acceptable if I had great handwriting, but I really don’t. Anchor Charts or a small bit of hand-writing is one thing, but I did entire displays with my wonky writing. Taking the time to create a poster on the computer was totally worth it, because it was legible and will look professional. Especially if you have a large population of at-risk kids, a sloppy room gives the impression that you have no intention to stay. Now if your edges are slightly off center, that’s not a big deal. But certain amounts of polish to your room helps to set your classroom environment, which in turn helps set classroom management.

Tip #4: Post your rules
This is hugely helpful for classroom management. When a kid is making silly choices, a raised eyebrow and a finger pointing to the rules is often enough to quell the behavior. Yay for non-verbal cues!

Make a good choice, kiddo.


Tip # 5: Hiding Places
Sooner or later, a kid will be having a very bad day and will break down in your class. Many, especially kinder kids at the beginning of the year, immediately want to find a hiding place. Look over your set-up and see if you have any. Maybe you don’t want to have any, or maybe you do. (Perhaps you want a hiding place to be a cool-down area, or you want one for a game. Perhaps you want nothing but open space.) But if they are there, make sure you know where they are.

Tip #6: Cool-down Spaces
Related to hiding spaces are cool-down spaces. Have a designated space where kids go if they need a second to re-group. What that looks like is up to you: a desk with a think-sheet, a carpet square outside of the circle or rows where they can still watch, or maybe a chair with a glitter bottle. Sometimes schools will dictate what they want cool-down spaces to look like so they are consistent throughout the building. Whatever your cool-down space looks like, make sure it is clearly labeled and communicated to the students so instruction time isn’t wasted when a student needs to go there.

Tip #7: Materials
Consider how you will get materials to your students quickly. How are your instruments going to be set up? Will certain ones be out all the time? Where will the rest go? I leave my tone bars out at the back of the room in three long rows, and have my non-pitched percussion in bins along one wall. All of my instrument bins are labeled with the instrument name as well as a picture of the instrument. This helps primary and ELL kiddos put away instruments quickly. My instrument bins are also organized by category sound: click, scrape, jingle, rattle, and ring. (I got that idea from Barbara Grenoble, and it is SUPER helpful when getting kids to analyze non-pitched percussion sounds.) 

Most elementary music rooms don’t have desks, so that means writing projects like composition can be a bit of a pain to manage. I love my open room, but when I first started I lost a lot of instruction time to handing out pencils and paper. How are your writing materials stored, and how are they handed out? I have shower caddies from the dollar tree (I love the dollar tree. I love that place so much!) that I use to store any materials like pencils and paper. Everything is sectioned out into groups of 6, so when I am preparing for the next class I can just grab a chunk of paper and plunk it into a caddy. 6 boards go under the caddy because they are too big to fit inside. The caddies are also handy for handing out baggies of manipulatives like rhythm kits or for small non-pitched percussion.
It really helps to be purposeful about setting up your room. Keeping things in mind like décor, functionality, and specific spaces in your room can help your class run smoothly and ultimately improve your instruction.


Have fun setting up the perfect classroom for a great year!