Thursday, November 12, 2015

Word Wall Update

I completely revamped my room this year, with a focus on posted vocab. My school is focusing on using academic language in class, so word walls are required. I like most of my room, but as the year has gone on I’ve liked the front and back vocab walls less and less. Students weren’t really using the giant word wall at the back, and because expression was at the front of the room they used those words for EVERY answer, regardless of what we were studying. I think the sheer number of words at the back was intimidating, and students plain forgot that it could be a resource.

So, new solution: new word wall! I re-used my words from the front of the room and made accompanying vocab cards for all the concepts we have covered so far. Stars are posted next to the concepts we are currently work on so students can focus in on them quickly. I’ll have to switch out some words in January, but I’m hopeful kids will use this new word wall more.

Here's the old word wall:


And the new word wall:


Do you use word walls at your school? What do yours look like?

Thursday, November 5, 2015

Candy Rhythms


Candy is a relevant topic for my kids any day all the time, but right after Halloween candy is all they want to talk about. I decided to use that to my advantage with a connection to rhythm.
My district is really pushing for essential questions in the classroom. For this lesson, I actually really liked using one. I put this question on the board: “How does rhythm relate to language?” We discussed it, and at first the main answer I got was a shrug. Then we talked about rap and hip-hop using words with rhythms, which blew their minds. It was a good hook for when we entered into the candy rhythm activity.

The manipulatives were pretty easy to make. I found images of several popular candies, printed them out, and had them laminated. The best part about this is I can use the same manipulatives in several different ways. Here are the four I am using, but I am sure there are more. If you use something similar in a different way, I would love to know!

1.) Partner work, notating rhythms
After reviewing previous rhythms, we took candies and assigned rhythms to them. If you like, you could give each candy an assigned rhythm. I wanted to up the rigor, so kids were welcome to use whichever candy they wanted as long as each syllable of the word was represented. Kit-Kat, for example, could be both paired eighth notes and a dotted quarter/eighth rhythm.
Once kids had the idea, we decided on a candy as a class and students decided which rhythm they wanted with the candy. They then notated those rhythms. After being comfortable with working on the same rhythm as a class, kids created their own rhythms with their partner and performed them for another group.

Here is an example of a page from my SMART file for this activity. 

2.) Guided identification
For first grade, rhythms are still a fairly new concept so candy rhythm was a bit more structured and guided. We started with using the smart board to make connections between syllables and note heads (yeah cross-curricular!) and matching rhythms to candies. Then, we added manipulatives. Students used a sorter with definitions to sort tiny quarter notes, eighth notes, and quarter rests. We then used those rhythms to match them to the correct candy. The kids LOVED this activity. They were eerily well behaved with bubbles in their mouths the whole class so they had more time for "the candies". My latest formal observation happened to fall during this lesson, and my admin loved it too.

A page from the SMART file.

3.) Rhythm Flash Cards
I have a GIANT pile of rhythm flash cards, so this allows students to start with the rhythm and find a candy to match. There are several answers to each card, so students enjoy comparing with a partner and checking each other’s work.

4) Composition/Performance Task
Since we already use the manipulatives to help us identify rhythms, using them as tools for composition is a natural transition. Students are given some parameters (time signature, how many beats, required rhythms, and so on) and complete their composition alone or with partners. Once the rhythm can be completed with clapping, students move their composition to a non-pitched percussion instrument of their choice.

My district is also big on performance tasks, and this activity can absolutely fit the bill. If you would like to approach this as a performance task, here is a sample scenario (feel free to switch out any specific to work for you):

A candy store has hired you to create a chant for a commercial using the names of popular candies. You will create an eight beat chant in 4/4 time using the names of at least four candies. Your rhythm must include at least one dotted quarter/single eighth OR one triplet. You can also use whole notes, dotted half notes, half notes, quarter notes, eighth notes, sixteenth notes wholes rests, half rests, or eighth rests. You may perform this rhythm using body percussion or non-pitched percussion. Your chant will be recorded so it can be sent to the candy store CEO for approval.

Here it is all pretty:

Looking for more ideas for rhythm? There are several in this post.

Hope you found a delicious idea to take back to your classroom!
Wednesday, October 21, 2015

Lit Lesson: A Spooky Story


Halloween is such a cool opportunity to make awesome, spooky music with children. It’s always one of my favorite times of the year! It’s also conference month, which means we always end up with a week of weird schedules and half-days. It can be hard to find a lesson that is engaging but also enrichment. Spooky books are a great solution. We try to stay away from things that are exclusively Halloween and do spooky things instead, so all students can participate. Last year, the kids hada blast with the Bill Martin Jr/Eric Carle book A Ghost Story. This year, we are exploring another Bill Martin Jr. book: A Spooky Story.

The book, the cards I use to help students remember their character, and a few of the instruments kids commonly choose.

This book is a very formulaic counting book. “Out of the shadows, out of the flum,” is followed by a number of spooky characters including a cat, witches, skeletons, and werewolves. The end of the book has those characters doing several things like wailing and turning, and we use that as an opportunity to crescendo. The characters finally go back into the flum, a good opportunity for a decrescendo.

Inevitably, a kid always asks, “What is flum?” Because the author made it up, kids use context clues to decide what exactly the flum is. Usually kids decide it is some kind of home world or portal for the spooky characters. Yay cross-curricular opportunities!

We begin by reading the book a few times, until the kids can identify the form of the book. We then add in D and F on tone bars to lay a spooky, minor sound blanket over the story. Students choose instruments for “shadows,” “flum,” and each of the 10 characters. This is a great way for students to explore instruments they don’t get to play very frequently like the ratchet, the thunder tube, and my piano. It’s also good practice to model the correct way to choose an instrument to fit a theme or character. My kids are always tempted to choose an instrument just because they like it, not because it is the best choice for the sound they want. So we go over the fact that we may love the bell tree because it sounds like Tinker Bell, but it’s probably not be the best choice for a spooky werewolf.

Students play through the book several times, switching instruments each time. I have cards for each of the characters so they don’t forget who they are. One student also serves as the narrator and reads the book. When the kids are ready, we record. Kids get very excited about sending a recording to their teacher, and beg me to play it for the kindergarteners to see if it scares them. You could very easily have kinder classes choose the spookiest recording.

Hope you have a spooky time with this fantastic book!


Friday, September 18, 2015

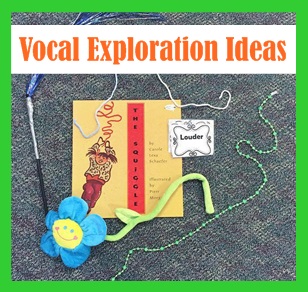
Vocal Exploration Ideas


Vocal exploration is a great way to help primary students find their head voices. For me, it’s been an important step to help students feel comfortable singing. Here are some ways I use it in my classroom.


This is a cute book about a girl who finds a string and uses it to create all kinds of interesting shapes. We take strings (you could also use a jump rope) and use them to create the pathway we will follow with our voices. As an extension, you can turn this into a partner game. One student sets up the string and the other student performs it. I also use cards to have students practice with a certain dynamic or tempo.

Moldable Flower
Man, do I love the Dollar Tree. I picked up this genius toy and it made my day! The flower stem has flexible metal inside, so we start at the flower’s face and use the stem as our pathway. If you have enough, this could also be a partner activity like the string.

Teachers Pay Teachers
There are plenty of vocal explorations PDFs for sale at Teachers Pay Teachers, though there are some great free ones too. I like this free PDF with an alien theme from Mrs. Ford’s Melodies.

Here is an example of a SMART presentation I've made, using clip art from Creative Clips.
SMARTboard Ideas
I like to create my own vocal exploration activities. It’s actually very easy to do! I start with two pieces of clip art that go together (candy and a bag, bookworm and a book, guitar and a case, etc.) and use the pen to create a line between the two. I lock the image on the left and the line, and leave the image on the right alone so it can travel on the pathway as students perform it. You can also leave the space blank so students have space to create their own pathway with the pens.

Here are some of my favorite options for clip art, all from Teachers Pay Teachers:
·         Artifex, which has some great music clip art
·         Dancing Crayon has a wide variety of instrument clip art
·         Educlips is a huge store with lots of variety
·         Creative Clips has a wide range of clips and awesome freebies
·         LovinLit is a good source of backgrounds and frames, if you want it to be fancy.

Happy exploring!

Wednesday, September 2, 2015

Using Memes in the Music Room: Part Two


See the first part here.

I love using memes in my class. Kids are definitely exposed to them and love seeing ones they recognize. They are also a great and sneaky way to get kids to make connections. In order to get the joke, kids have to understand the concept the meme is about and be able to apply it to the given situation. Despite having a reputation of being only relevant to teenage geeks, memes are actually great learning tools.

About a year ago, I was spending a good portion of my free time on the internet, scrolling through any music meme I could get my hands on so I could use them with my kids. Kids loved them. The problem I kept running into was that what I found didn’t always fit what I wanted. I never made my own, though, because that just seemed so HARD.

I have a message for my past self: making a meme that is exactly what you want takes significantly less time than google image (or Pinterest) searching for hours and hours.

It’s surprisingly easy. All you have to do is go to a generator (I like this one) and search for a template image to use. Then you add your text.

I can haz piano?
Here’s what I did to make this one: I knew I wanted a meme for the dynamic piano, so I searched for “library” and a cute cat came up. Add in some text and you are done! If you need a specific picture, you can download it to your computer and upload it to the generator. I promise, it is super easy.
I use them as a quick, 1 minute review of our previous lesson’s concepts. Kids have to explain (in a complete sentence) what the joke is and what the term used in the meme means. It’s much more engaging, and more rigorous, than just repeating definitions.

Here are a few I’ve created so far.


My kids struggle with "gradually" getting louder


MEDIUM tempo! Get it? *ba dum dum ch*

I hope you have fun creating memes! Please feel free to share in the comments!

Wednesday, August 26, 2015

Lit Lesson: Listen to the Rain

One of my favorite activities when teaching dynamics is having the students create a rain storm. I start by reading the book. It walks through a rainstorm from start to finish. The book, as it is, is best to demonstrate crescendo. If I want to demonstrate a decrescendo, I read the sections in backwards order.


Students start by watching this video to see how body percussion can show a rain storm. Then we try it as I read the book. When students are confident in when and how to crescendo/decrescendo, we add in paper. I get paper I plan on recycling and crumple it up, then have students use 1-5 fingers to control dynamics.

If you have them, rain instruments are a great add-in. Students play rain sticks and ocean drums the whole time and control their volume just like the students using paper as an instrument. I have a thunder tube (that the kids LOVE) and we only add that at our loudest volume. One of the best things about this activity is you can specialize it for several grades, depending on what dynamics they know and are learning.

It is also easy to tie in a rain song somewhere in the book. Here is a list of rain songsfrom Beth’s Notes that are a good start. Movement with scarves to represent clouds, rain drops, and the sun could also be added. With additions, this book could make an excellent program.
I hope your students have a blast creating rain storms!

Tuesday, August 18, 2015

Classroom Tour 2015-2016!


School started this week, so I’ve been spending some time in my classroom getting ready for the new year. I decided to completely redo my room so it was quite a lot of work, but I’m excited for the results! Prepare for a LOT of pictures and detail. :)

I know many people have different views on classroom decor, how you should do it and how cute or finished a room should be. I focus on making my room as functional as possible, with visual displays to help students remember vocabulary terms. Instead of a specific theme I chose a consistent pattern (chevron) with clear color-coding to help streamline the visuals.

At the back of the room is my word wall. Usually there are instruments set up too, but I won’t get them out until the third week of school. Each grade has its own board. The color is coordinated to the displays around the room, so kids can easily zoom in on their color. Above are smaller movement word walls, organized by locomotor and non-locomotor movements.

The front of the room has a thin table for my computer, document camera, supplies, and serves as my desk. There are steady beat light-sabers, a few chairs (I use them to teach rhythm, admin use them when they come in to observe) a SMART board, and my TAD display.

On the front wall I have a vocabulary display for tempo, articulation, and dynamics. Each term is color-coded to match the back wall and the grade level the term is introduced. That way, students can focus in on the terms we will be learning about.

This is the question board. My school is big on accountable talk, so the top are some phrases that students could use in music. Many of them relate to tempo, dynamics, and preference since that is prominent in the state standards. Below are essential questions for each grade tied to the concepts we are learning.

On one of my cabinets I have an audience and performance behavior display. It’s helpful to have a side-by-side comparison, especially for primary.


I love love LOVE my musical alphabet display. I used the alphabet found here, and color-coded them to match boomwhackers colors. I also have chord cards for I IV and V, as well as examples of what each chord is in the key of C.
Kids love the drum wall. Each are labeled and fit in spots outlined by washi tape. Below are non-pitched percussion instruments in labeled bins that have both a picture of the instrument and the name. On the floor are my two staff carpets.

I finally redid my library this year. Each bin (from the Dollar Tree, naturally) is organized by how I use the books within the classroom. Above are the boomwhackers in cardboard book boxes from Ikea. I copied mini musical alphabet cards that match the larger display and have those as labels. In front of the books I have a rest area for kids to use as a cool-down space.

Above the piano (covered currently with cloth because there isn’t a cover attached and I don’t want kids kerplunking notes when they walk by) are some staff posters I made in college. One day I’ll end up redoing them, but it is not this day. :)

The back cabinet houses my Solfege display and THINK, a strategy for questioning your own behavior that is really helpful when students work in small groups.

Here are my tone bar rules. It also included how we move when we rotate instruments.

This is right above my door. I’m a huge fan of Vlogbrothers, and “don’t forget to be awesome” is something I say fairly often. My kids love it and have started using it too! I used stickers on top of contact paper so I wouldn’t have to worry about getting the stickers off the wall.

Outside my room is one of my favorite boards, the meme board. I’m a huge fan of using memes in my teaching, and this year used a meme generator to create simple memes aligned to the specific skills each grade is learning. Again, it’s color coded to match the word wall. I also use these memes in class; students use them to review concepts. Above I used the Star Wars welcome banners found here.

 
The whole set-up!

EDIT: Here's the Rhythm Wall, one of the only things in my room that stayed the same this year. I love this thing. I has the rhythm, name, and number of sounds/beats. (That is how my curriculum defines rhythms.)

Whew, that was a long one! I hope you got some great ideas, and I hope you have a great school year!